How to Replace Bike Brake Pads: A Beginner-Friendly Step-by-Step Guide
Replacing bicycle disc brake pads for the first time can feel intimidating. Many riders worry about doing something wrong or damaging their brakes. The good news is that replacing disc brake pads is not complicated. As long as you understand why each step matters and pay attention to small details, even beginners can complete the job safely and restore strong braking performance.
Before you start, it helps to make sure you are using the correct brake pads for your brake caliper. If you are unsure, reading How to Choose the Right MTB Brake Pads will help you identify your caliper type and pad shape before installation.
When Should You Replace Disc Brake Pads
Brake pads are wear items. As they wear down, braking power decreases and safety can be compromised. The following signs indicate that it is time to replace your brake pads.
1. Pad thickness is less than 1 mm
The friction material is the part of the brake pad that contacts the rotor. When this material wears down to less than 1 mm, braking performance drops significantly.
2. Metallic grinding noise when braking
A sharp metal-on-metal sound usually means the friction material is completely worn out and the pad backing plate is contacting the rotor.
3. Braking feels weaker or requires more force
If you need to pull the brake lever harder to stop, it may be due to pad wear or system overheating.
4. Visible deep scratches on the rotor
Deep scoring on the rotor often means the pads were ridden past their wear limit or the pad compound was not suitable for the riding conditions. Understanding material differences such as organic vs ceramic or sintered vs graphene can help determine whether the pad choice was appropriate.
Tools You Will Need
- Hex key or T25 Torx wrench
- Flathead screwdriver
- Isopropyl alcohol
- Lint-free cloth
- Plastic tire lever or piston press tool
- New disc brake pads that match your caliper model
If you are unsure which brake pads fit your caliper, you can confirm the correct model using How to Choose MTB Brake Pads before proceeding.
Step by Step: How to Replace Disc Brake Pads
These steps apply to most hydraulic and mechanical disc brake systems.
Step 1: Remove the wheel or position it for access
Whether you need to remove the wheel depends on your bike and available working space.
Removing the wheel is recommended if:
- The caliper area is tight or hard to see
- You are working on the rear wheel
- You want to clean the caliper thoroughly
- This is your first time replacing brake pads
In this case, release the quick release or thru axle and remove the wheel.
You may leave the wheel installed if:
- The caliper is easily accessible
- You are doing a quick pad replacement
- You have clear visibility and working space
Make sure the bike is stable and the caliper is easy to reach.
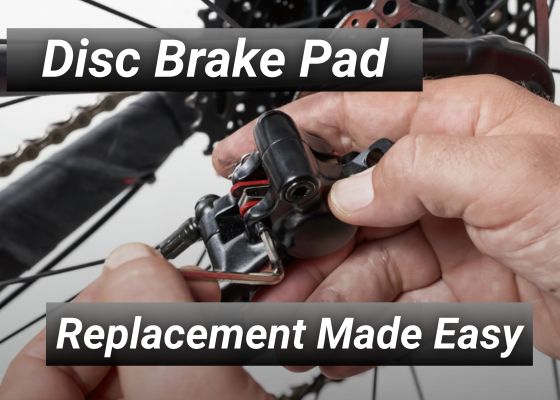
Step 2: Remove the pad retaining pin or bolt
Brake pads are typically secured with either a metal pin or a small bolt. Use the appropriate tool to loosen and remove it.
Step 3: Remove the old brake pads and spring
Pull the pads and spring out together. If they are tight, gently wiggle them side to side before pulling.
Important: Avoid touching the pad friction surface or contaminating the caliper interior.
Step 4: Clean the caliper interior
Spray isopropyl alcohol inside the caliper and wipe it clean with a lint-free cloth to remove brake dust and possible oil residue.
A clean caliper allows the pistons to move smoothly and helps prevent uneven pad wear or contamination of the new brake pads.
Step 5: Push the brake pistons back
Brake pistons are the small round components inside the caliper that push the pads toward the rotor. Before installing new pads, the pistons must be fully pushed back.
Use a plastic tire lever or piston tool and apply even pressure.
Do not use metal tools, as scratching the piston surface can lead to seal damage and brake fluid leaks. If the pistons are very difficult to push back, the issue may be related to overheating or contamination.
Step 6: Install the new brake pads
Insert the new pads with the spring placed between them.
- Friction surfaces face inward
- The spring applies outward tension
Step 7: Reinstall the retaining pin or bolt
Reinsert the pin or bolt and secure it firmly without overtightening.
Step 8: Reinstall the wheel and check for rubbing
Spin the wheel and listen for rubbing. If rubbing occurs, slightly loosen the caliper mounting bolts, squeeze the brake lever to center the caliper, then retighten the bolts.
Bed In the New Brake Pads (Very Important)
New brake pads must be bedded in to achieve full braking power and quiet operation.
- Ride at a moderate speed
- Apply the brakes smoothly to slow down
- Repeat 10 to 15 times
For a detailed explanation, see Brake Pad Bedding-In Process.
Choosing the Right Brake Pad Material
- Quiet and smooth modulation: Organic vs Ceramic
- Long descents or aggressive riding: Sintered vs Graphene
- Compare all options: TOP BRAKE Series Comparison
Final Checks
After installation, confirm that the caliper is aligned correctly and braking feels consistent. Take a short test ride before returning to normal riding.
If you are new to mountain biking, combining proper brake setup with basic riding skills will further improve control and safety.